|
TADEUSZ LIS ODPOWIADA NA PYTANIE
z dnia: 2020-10-25
 To news niby chroniący nas przed kompleksami. Bo niby świat ma nas za zaścianek, za kraj próbujący To news niby chroniący nas przed kompleksami. Bo niby świat ma nas za zaścianek, za kraj próbujący
nadążać, a tymczasem okazuje się, że te niby zacofanie podtrzymuje zdolność twórczego myślenia, dawania sobie rady samodzielnie. Oczywiście – nie bez znaczenia jest powszechna opinia, że Polska jest krajem tanim. Tak czy inaczej – miło jest że SSI jest czytane nawet tam gdzie ludzie chodzą do góry nogami. Tym razem sprawa jest prozaiczna – chodzi o głupie uszczelki. Tadeusz się nie obraża i cierpliwie tłumaczy. A ja uparcie: Maseczki, rękawiczki, dystans, dezynfekcja i bez wałęsania się 1 Żyjcie wiecznie ! Don Jorge =========================== Dear Captain Kulinsky Two years ago we began a major overhaul of our 50 ft moto-sailer. The work was done relatively quickly, but in the last stage we faced a costly challenge with repairing leaking hatches and wheelhouse sliding doors. The problem lays in the non-standard shaped gaskets. The rubber looks very good, unfortunately its part in the form of pocket has lost its elasticity and water gets inside - even with medium rainfall, not to mention a storm. We were looking for similar seals, but since the yacht is already 80 years old, we found nothing similar. Our boatbuilder gave us a contact to a company that making restoration of vintage cars, which could provide us with identical seals. Unfortunately, the cost of preparing a mold to make a gasket is around 3000 -3200 AUD. I would like to point out that we tried to make folding seals but their performance were not too satisfactory. The original solution was reliable and in the 90s, when I sailed with my father, the interior was dry even in very heavy storms, so we would be happy to stick to the proven gaskets. Maybe your editorial technical experts would be able find at least a bit cheaper solution? Since the thing is critical for the safety of the yacht and for the comfort of sailing, we could invest up to 2000 AUD - for example, reducing the cost of making dedicated mold used for example 3D printing. Do you think that at this price it would be possible to find a solution in Poland? We have heard that there are a lot of prototyping workshops in Poland working for small and medium-sized enterprises, so we hope that the cost of additional gaskets could be lower than in Australia. If we fail to make replacement gaskets, we will consider replacing all deck hatches and wheelhouse doors - but this is a last resort action. If possible, we would like to preserve historic character of our yacht, which has been kept in its original condition in our family so far. M. Svanson&M. Wolska-Svanson, Cullen Bay Marina, AU Dear Colleague Martin, The problem that you encountered while renovating the motosailer is well known to me as the owner of both a 100-year-old yacht and a collection of vintage cars. Also, many of the owners of historic vessels that I know, have faced a similar, costly challenge of making custom seals. I also tried to go the same way by ordering the production of a dedicated shaped mold (one-off type) and only focusing on the possible reduction of its cost. But It was mistake, though idea was not completely dummy.
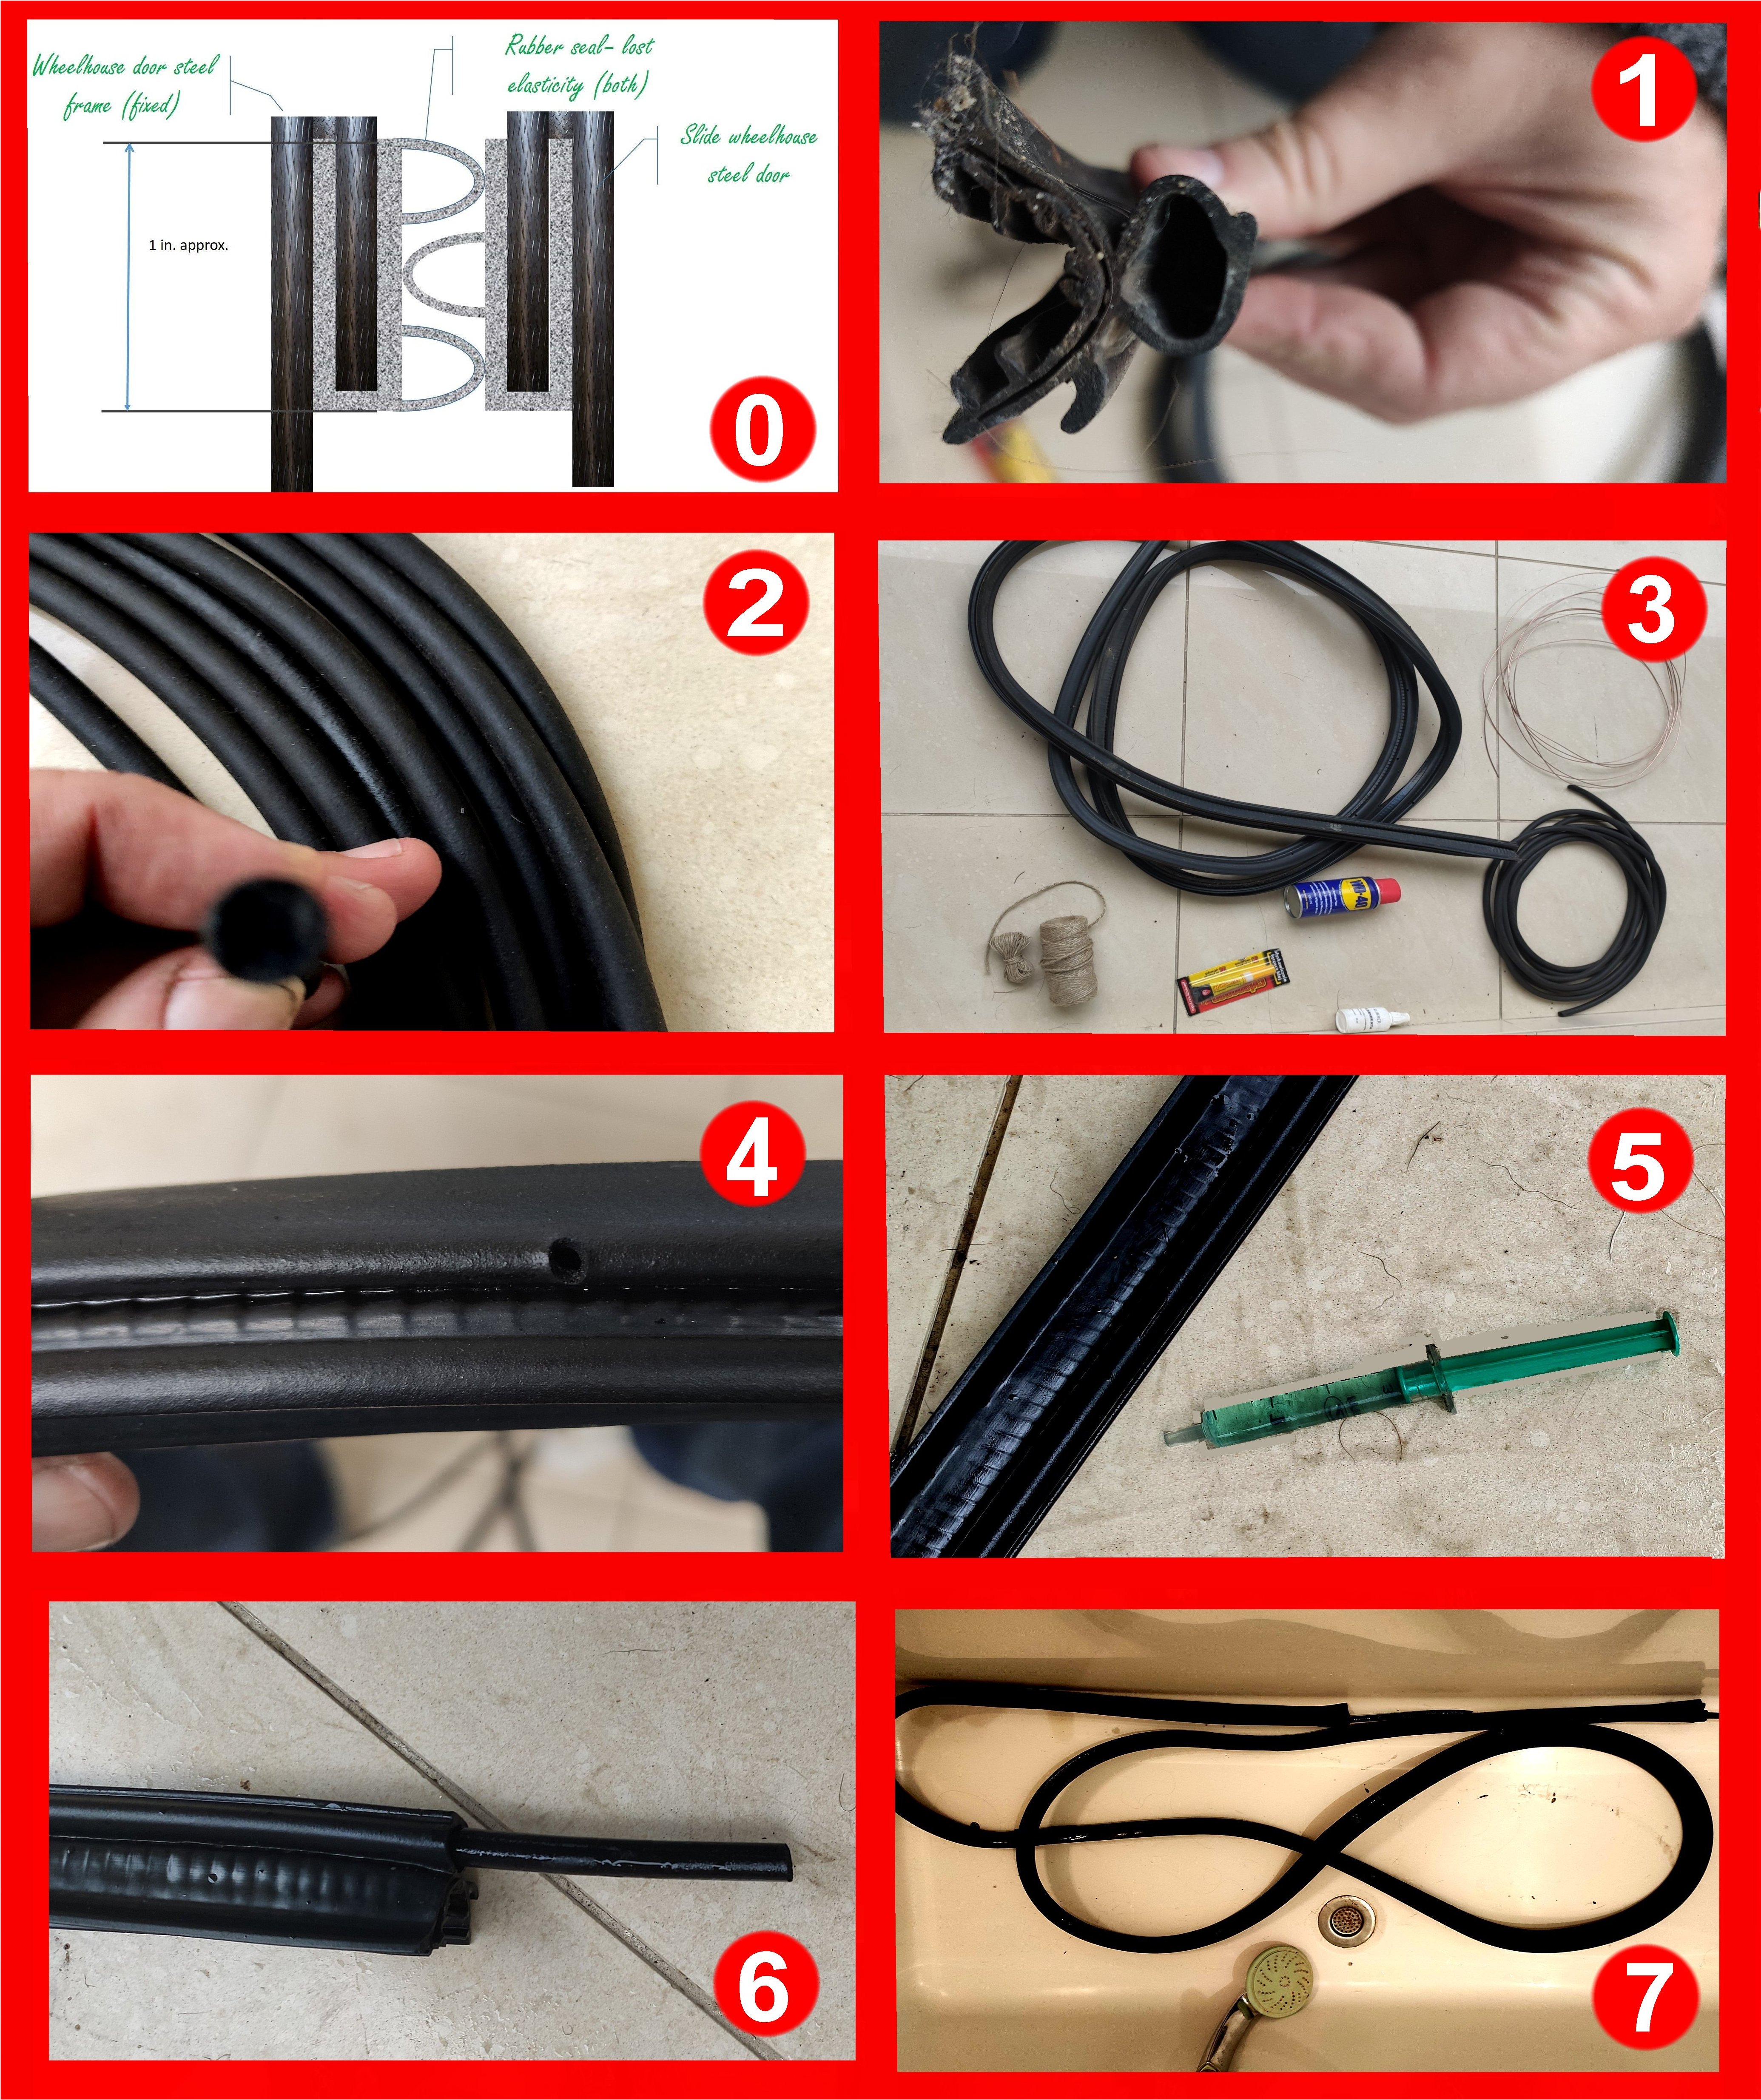
Figure 0 ‘ .The form for the creating non-typical gasket can be made significantly cheaper, if we avoid making a dedicated head for the EDM machine. Such a form could be designed as foldable, because it is much cheaper to mill external shaped surfaces than to drill internal ones. Nevertheless, the finishing work is tedious and almost always ends with lapping the mold by hand. Total cost is about $ 700-1000 – and does not want to be less. That is why I decided to prepare a short instruction on how to achieve the same effect for thetotal amount not exceeding USD 10-15. Detailed written description would be difficult to understand, so I decided to use the last days of the autumn sun to prepare illustrated story. The idea is very simple – we fill the original tube with a flexible rubber roller. See the pictures below. My only advice – follow suggested technological regime and not be discouraged after the first unsuccessful attempts.
Figure 1 - the rubber is in good condition (not cracked) but has lost its elasticity .
Figure 2 - ready rubber roller, bought off the shelf . To complete the entire operation, we will need a few elements shown in the photo below. Those are: 1. A springy wire that will serve as a pilot for threading the rubber roller 2. Any degreaser 3. Spray lubricant or even better liquid soap (any detergent) 4. Strong cyanoacrylate adhesive 5. Thin twine to make a bond on roller 6. Rubber roller smaller by 2 mm than the diameter of the gasket tube 7. Quite a lot of patience and a second person to help with working clothes
Figure 3 - a set of components to repair the gasket . The operations begin with lubricating the gasket inside the tube (NOTE! DO NOT USE AUTOMOTIVE OIL FOR THIS, AS IT MAY IRREVERSIBLY DAMAGE THE GASKET). As the door seal in the motosailer can be about 6 meters long, the chance that we will lubricate it well by injecting grease from one end is rather low. Therefore, I suggest using the following trick: 1. Fill a large syringe with detergent 2. Inject the detergent through the vent holes of the gasket (see below)
Figure 4 - inject detergent inside through these holes . 3. If there are none - use a syringe needle 4. Squeeze the gasket with your fingers, until detergent comes out with the other end of tube Figure 5 - Syringe with detergent. This one was too small, so the operation took us a long time . The detergent variant was clearly my preferred choice as my favorite Wife expressed moderate enthusiasm for permanently covering the balcony floor with a highly adhesive waterproof lubricant… Women sometimes have this type of whim that somewhat reduces our artistic enthusiasm for taking great cuts… Back on the track. Form loops at the end of the wire (in order not to injure the inside wall of the seal) and gently slide it inside until it comes out with the other end. The seal should then be slightly tautthanks to a second person holding its free end. Springy wire could be obtain by burning a small car or motorcycle tire. Environmental purists must forgive ... Once the wire is threaded, cut it with pliers so that it protrudes about 5 inches on the other side. The end of wire should be carefully ground with a file to obtain a sharp end point. Please follow the instructions carefully. Degrease the sharpened end of the wire and coat it with cyan glue. Prepare about 6-7 inches of twine. Stick about 1 inch of the wire covered with glue into the end of the rubber roller (from the forehead). Maintaining alignment is critical - otherwise the wire will break when pulled through. After pasting, wrap the end with twine, just like we would make a band on a rope. This must be done in a way that the compressed rubber thread forms a cone towards the wire. Do not overdo it, because the twine will cut the rubber. Now bring the roller inside. Do not hurry up. It is a tedious and dirty operation. One person gently pulls the wire from the free end. The second person hands the roller inwards, lubricating it generously with detergent - inch by inch. If you feel resistance - stop pulling immediately and inject an additional dose of detergent into the place where the roller has already filled. By holding the wire taut, you will feel when the resistance has decreased (it may take up to several seconds) and you can continue. For the door seal from your boat, the threading operation will take approximately 20-30minutes. You must overcome internal rubber friction. Success looks like this. Do not be discouraged if the wire breaks several times while pulling. Regenerating the seal is a good character exercise and a thorough test of marital relations.
Figure 6 - regenerated gasket . Now use a sharp knife to cut off the excess roller on both sides. Peel off and glue both ends together. Finally, remove excess detergent from inside. Put gasket into warm water. It goes on for a while. But if we don't do this, we will have a soap bubble generator starting every time we close the hatch or the door on the yacht. Spectacular but not really necessary ...
Figure 7 - we rinse the revitalized seal until the soap bubbles stop appearing . Summarizing. The entire repair took about 2.0 hours (the seal broke twice during dragging). I spent around $ 13 on all components which seems to be quite attractive investment. For this sum, I bought materials in Poland to repair all seals, even on a very large yacht. Hope this simple idea (I am not an author of it) will help members of the SSI Clan in similar cases. In this way we repair refrigerator seals on our yachts and motorhomes or the gaskets on engine compartment covers. Finally, one more trick. If the rubber is slightly blotched by the sun, but not yet cracked, we can lubricate it with a blacking paste for car tires. Paste, probably based on methylene chloride (CH2Cl2), will gently dissolve the top layer of rubber and seal the cracks. Then, cover the gasket with a liquid for winter seal preservation - or in case of its absence - with a mild milk for polishing car dashboards. Spray it generously until it stops absorbing. Described technique effectively renew the seals for many years. I greet the whole Clan. T.L Figure 0 Figure 1 - the rubber is in good condition (not cracked) but has lost its elasticity Figure 2 - ready rubber roller, bought off the she Figure 3 - a set of components to repair the gasket Figure 4 - inject detergent inside through these holes Figure 5 - Syringe with detergent. This one was too small, so the operation took us a long time Figure 6 - regenerated gasket Figure 7 - we rinse the revitalized seal until the soap bubbles stop appearing
|